Thursday, August 20, 2009
Silhouettes
There are lots of tutorials on the web for creating silhouettes. My method is just a little different.
1. I take a profile picture with my camera and upload it onto my computer.
2. When it is displayed on my computer screen, I adjust it exactly to the size I need.
3. When I have it the size I need, I tape a piece of tracing paper over my flat computer screen.
4. I take a pencil and lightly trace over the silhouette.
5. Remove the tracing paper and tape over a piece of black cardstock and cut out the silhouette with both pieces of paper.
6. Once the silhouette is cut out, I mod podge it over a pre-painted wood plaque from Michael's.
7. Staple ribbon on the back and hang!
Super Saturday crafts
Here are some of our Super Saturday crafts this year:
"Boo" Halloween wall hanging
Nativity set ordered from Melinda
Christmas Countdown Blocks
Halloween Countdown Blocks
The Stockings Were Hung Board
Necklaces (picture from the Creative Crate)
Love Board
Gift Tags (our free craft)Silk Flower Hair Clips
Fabric Flower Hair Clips
Rose Stud Earrings (picture from Trey and Lucy)
Fabric Pumpkins
Monday, August 10, 2009
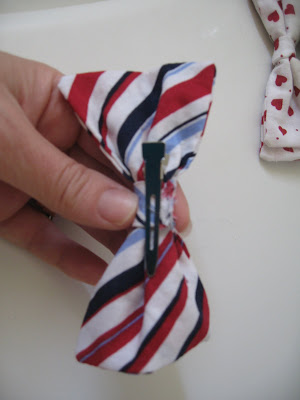
boys' bow-ties
I sew all the time for my girls and I finally found something I can sew for my boys: bow-ties. Now, bow-ties don't fit every boys' style, but they happen to fit my six-year old's style quite well--he's kind of the serious type. His two year old brother has started to like them only because big brother likes them. Although the two year old can't keep them on because he runs around so much as seen with it falling off in this picture:I've made them for several holidays with just scraps of fabric.
I put them on the boys' collars with an alligator clip.
Here are the instructions:
1. cut two rectangular pieces of fabric about 3 inches by 5 inches
2. sew those right sides together --leave the bottom unsewn about an inch in the center and turn right side out, press
3. cut two more rectangular pieces of fabric about 2 inches by 4 inches
4. repeat #2 with these pieces
5. cut a strip of fabric about 1 1/2 inches by 5 inches
6. fold the strip in half lengthwise with the right sides together
7. sew along the long side and turn inside out, press
8. stack smaller rectangle on top of larger rectangle and wrap the strip around while pinching the rectangles into a bow, sew strip closed in the back, cut excess
skirts for myself
I don't think I've sewn myself anything since I've had kids, but I was inspired by the skirts that Abby made at A Feathered Nest, so I decided to give it a go.
This one has the stretchy cotton waistband--so comfortable and so easy. The instructions come from here.
And this one is even more comfortable. I used sewed 15 rows with elastic thread for this one. I found the instructions by googling "sewing with elastic thread." I found this site and this site helpful.
Sunday, August 9, 2009
Easter dresses
Personalized cupcakes
Halloween costumes
I made this Baby Buzz Lightyear costume and didn't have to sew anything but the cap. I took an old sleeper that I had from my daughter that was pink and bleached it white. Then, following a store-bought Buzz costume in a bigger size, cut felt pieces to match. I glues them on with hot glue because I didn't have any fabric glue on hand. (I have an adversion to fabric glue--growing up my mom didn't sew, so she glued EVERYTHING. I swore I wouldn't do that, but its fine for anyone that doesn't have psychological damage from it)
Just about any pattern can be made into a Halloween costume. Its just the fabric that makes the difference. I made my son a Mad Hatter costume by taking a pattern for a regular fleece jacket and pants and used costume fabric from Joann's. For the hat, I took leftover fur from a Santa costume and glued it inside a painted plastic top hat purchased from the costume store for 99 cents.
For my Cruella Deville costume I continued using the remnant of fur from the Santa costume to make my dalmation stoal. I took a fabric marker and colored all the marks on it. Added my favorite black dress, a thrifted 50 cent belt, and a lot of black and white hairspray to complete the costume.
window treatments
These are the simplest window treatments ever which is why they are all over my house. I did line the back with some scrap fabric so the light wouldn't shine through, but that's all the sewing that is requred. The fabric is stapled onto a 1 x 3 and then screwed into the wall using an L-bracket. You may or may not add the ribbon ties.
This has been in my home for almost as long as we have lived here. We had a brand-new home at the time and didn't have any tree branches I could use. I was at the church on a Saturday and they were trimming down the trees in the parking lot, so I grabbed one of their branches. I had a friend at the time that had this great leaf font and made this quote into vinyl for me. She's moved away, and I can't find her link anymore online.
Clock
Subscribe to:
Posts (Atom)